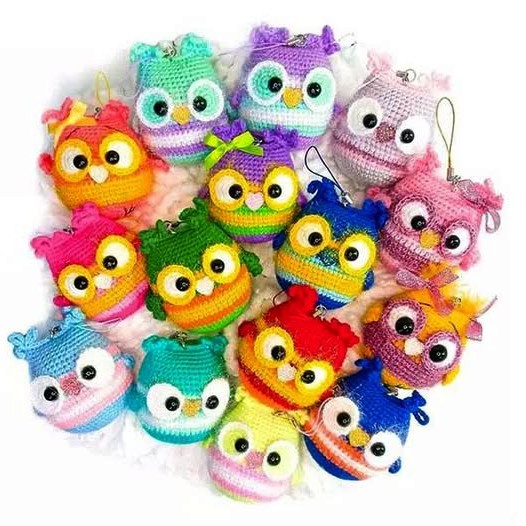
Skill Level: Easy
This fun and simple pattern will guide you through crocheting your very own owl keychain! It’s a quick project that’s perfect for beginners and a great way to use leftover yarn.
Recommended Materials:
-
Yarn: Any acrylic or cotton yarn suitable for amigurumi will work. The designer suggests Pehorka Dety Novinka and YarnArt Christmas for a sparkly touch.
-
Hook: 2 mm crochet hook
-
Eyes: 8 mm safety eyes
-
Stuffing: Fiberfill or toy stuffing
-
Nose: A heart-shaped button or a small piece of felt
-
Keychain hardware
-
Tapestry needle (for sewing parts)
-
Scissors
Finished size: Approximately 6–7 cm tall
Abbreviations (US Terms):
-
KA – Magic ring (amigurumi ring)
-
ch – Chain
-
sc – Single crochet
-
hdc – Half double crochet
-
dc – Double crochet
-
tr – Treble crochet
-
inc – Increase (2 sc in the same stitch)
-
dec – Decrease (sc 2 together)
-
(…) x n – Repeat the instructions inside the parentheses n times
Owl Keychain Pattern
Body
You can choose your own colors. For clarity, the pattern will refer to:
-
Color 1 – Main body color
-
Color 2 – Contrasting shade
-
Christmas – Sparkly yarn (e.g., YarnArt Christmas)
Begin with Color 1:
-
Round 1: 6 sc into a magic ring (6)
-
Round 2: (inc) x 6 (12)
-
Round 3: (inc) x 12 (24)
-
Round 4: (3 sc, inc) x 6 (30)
-
Round 5: (4 sc, inc) x 6 (36)
-
Round 6: (5 sc, inc) x 6 (42)
-
Round 7: (6 sc, inc) x 6 (48)
-
Round 8: (7 sc, inc) x 6 (54)
Color changes for rounds 9–20:
-
Rounds 9–10: Color 2
-
Rounds 11–13: Christmas yarn
-
Rounds 14–15: Color 2
-
Rounds 16–17: Color 1
-
In Round 16, crochet the wings in the front loops only.
-
-
Rounds 18–19: Christmas
-
Round 20 onward: Continue with Color 1
Wings (Crocheted Directly Onto the Body)
First wing (starting in Round 16):
-
In the 1st front loop: 2 sc, 1 hdc
-
In the 2nd front loop: 1 dc, 2 tr, 1 dc
-
In the 3rd front loop: 1 hdc, 2 sc
Next, crochet 24 sc, then create the second wing:
-
In the 28th front loop: 2 sc, 1 hdc
-
In the 29th front loop: 1 dc, 2 tr, 1 dc
-
In the 30th front loop: 1 hdc, 2 sc
Complete the round with 24 more sc.
In Round 17, crochet 54 sc in the back loops, working over the wings.
Shaping the Body
-
Round 21: (7 sc, dec) x 6 (48)
-
Round 22: 48 sc
-
Round 23: (6 sc, dec) x 6 (42)
-
Round 24: 42 sc
-
Round 25: (5 sc, dec) x 6 (36)
-
Round 26: 36 sc
-
Round 27: (4 sc, dec) x 6 (30)
-
Round 28: 30 sc
Stuff the owl firmly with toy stuffing.
Then fold the top of the body flat and crochet 15 sc across the top to close.
Ears
For feather-like ears, you can either:
-
Attach tassels, or
-
Crochet three chains of 10 ch each. Join each into a ring by slip stitching into the beginning and end of a row.
Eyes (Make 2)
Use white yarn or any color you like:
-
Round 1: 6 sc in a magic ring (6)
-
Round 2: (inc) x 6 (12)
-
Round 3: (1 sc, inc) x 6 (18)
-
Round 4: 18 sc using Christmas yarn (optional for a sparkle)
Attach 8 mm safety eyes to the center of the crocheted eye circles.
Finishing Touches
-
Attach the eyes and nose using a hot glue gun, or sew them securely in place.
-
Add a keychain ring to the top.
-
Feel free to decorate with bows, flowers, beads, or embroidery to personalize your owl.
Pattern by: Olga Romakhina – [@o.romakhina]
Happy crocheting! 🦉✨