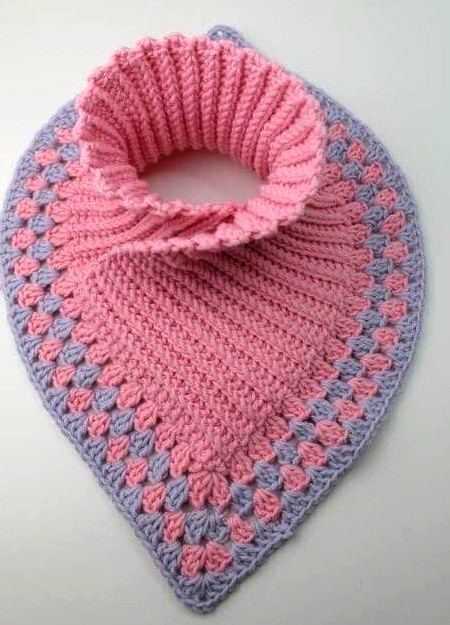
Crochet Cowl Neck Pattern
A crochet cowl neck is a timeless accessory that blends warmth, comfort, and handmade elegance. Simple yet stylish, cowls are loved for their versatility—they slip easily over the head, sit neatly around the neck, and instantly add a cozy touch to any outfit. Whether worn casually or layered as a winter essential, a crocheted cowl is always a practical and fashionable choice.
One of the biggest advantages of a cowl is its ease of wear. Unlike traditional scarves, cowls don’t need tying or constant adjusting. Their looped design stays in place while providing warmth without extra bulk, making them perfect for everyday use during cooler months.
Finishing the Crochet Piece
When you complete the project, do not cut the yarn too short. Leave a long tail so you can securely weave in the ends. Thread the yarn tail onto a yarn needle and weave it through several stitches on the wrong side of the work. Once secured, trim any excess yarn.
Blocking the Crochet Pieces
Place each crochet piece right side down on a blocking board or ironing surface and pin it evenly along the edges. Always check and follow the care instructions on your yarn label before blocking.
-
Natural fibers (such as wool or cotton):
Lay a clean, damp cloth over the piece and gently press with a warm iron. Do not slide the iron—simply press and lift. Allow the piece to cool completely before removing the pins. After seaming, lightly press the seams if necessary. -
Synthetic yarns:
Do not use an iron. Instead, pin the piece into shape, lightly mist with water, and allow it to air dry fully.
Seaming
Place the crochet pieces with right sides together and secure them using pins. You can join the pieces either by slip stitching with a crochet hook or by sewing them together using a blunt yarn needle.
Always seam using the same yarn that was used for the project to ensure consistent wear and washing. If the yarn is very thick, it can be carefully split into thinner strands for easier sewing.
Care Instructions
Follow the care instructions provided on the yarn label. For best results, hand wash your crochet item and lay it flat to dry.
Materials
-
Yarn: Rellana Merino Big (50 g / 85 m) – approximately 150 g total
-
Crochet Hook: US J/10 (6–7 mm)
Instructions (US Terms)
Row 1
Chain 26. Insert the hook into the second chain from the hook and work 25 single crochet stitches across.
Row 2
Chain 1. Work 25 single crochet stitches as follows:
Insert the hook into the first stitch (2 loops on the hook), then insert the hook into the second stitch from back to front (4 loops on the hook). Complete a single crochet.
Continue across the row in this manner. At the end of the row, work one single crochet through the last two loops.
Row 3
Chain 1 and repeat Row 2 exactly.
This stitch pattern creates a ribbed texture. Continue working rows until the piece measures approximately 60 cm (24 in) in length.
The width should measure 18–20 cm (7–8 in).
Length guide: Head circumference + approximately 5 cm (2 in).
The number of ribs must be even.
Folding the Crocheted Rectangle
Fold the rectangle so the side with the last stitch is positioned on the left. Fold this corner downward and place the opposite side over it, forming a pointed shape at the bottom.
(Back view)
Joining the Piece
Insert the hook through both points, working through both layers. Chain 3, then work 2 double crochet stitches into the same stitch.
At each rib (insert the hook just to the left of the rib), work 3 double crochet stitches into the same stitch. Continue joining both sides together in this way.
Work toward the center back, spacing the ribs evenly. Between the center double crochet groups, chain 3. Continue following the pattern. At the point, again join both layers together.
At the end of the round, insert the hook into the point, work 3 double crochet stitches, chain 2, and close the round with a slip stitch, changing color if desired.
Slip stitch: Pull the working loop through the loop already on the hook.
Round 2
Begin with chain 3. After the third double crochet, insert the hook and work 3 double crochet stitches.
Always work 3 double crochet stitches between each group of stitches.
At the back point, work into the chain-2 space:
3 double crochet, chain 2, 3 double crochet.
Continue following the pattern.
At the front point, work into the chain space:
3 double crochet, chain 2, 2 double crochet.
Close the round with a slip stitch into the third chain.
Additional Rounds
Begin each round with chain 3 and repeat the same stitch pattern.
Work as many rounds as you like. For this model, three rounds were completed.
Tutorial Video
This video from channel NK-Art
Finishing
Weave in all yarn ends securely, and your crochet cowl neck is ready to wear or gift.