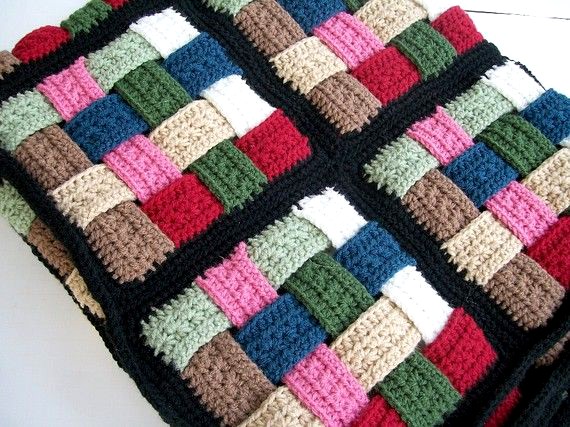
If you’re looking for a crochet afghan that is both unique and visually impressive, the Woven Afghan is a wonderful project to try. This design is created using simple double crochet strips that are joined and woven together, resulting in a beautiful basket-weave texture. It’s an excellent stash-busting project and a fun way to experiment with different color combinations.
Perfect for beginners and experienced crocheters alike, the Woven Afghan blends simplicity with creativity. The pattern is relaxing to work on, yet the finished result looks intricate and eye-catching. One of its biggest advantages is versatility—you can easily adjust the size, play with bold or subtle color contrasts, and choose a border style that reflects your personal taste.
In this tutorial, you’ll learn how to crochet the individual strips, join them together, weave them into place, and finish your afghan with a polished border. Best of all, resizing the blanket is simple: just add more strips until you reach your desired dimensions.
Tutorial Video Woven Afghan Here
🧶 Materials
-
Yarn (any colors of your choice)
-
3.5 mm crochet hook
-
Darning needle
🧵 Step 1: Crochet the Strips
You will need a total of 12 strips:
-
6 strips in Color A
-
6 strips in Color B
To begin each strip:
-
Make 30 chainless foundation double crochet (dc) stitches.
Alternative method:
If you prefer a traditional foundation, chain 32. Double crochet in the 3rd chain from the hook, then dc in each chain across for a total of 30 dc.
Row 2:
-
Ch 3, turn.
-
Dc in each stitch across (30 dc).
Note: The ch-3 does not count as a dc. Make your first dc in the last dc of the previous row.
Fasten off and weave in the ends.
🔁 Repeat until you have all 12 strips completed.
🧩 Step 2: Join the Strips
Now comes the fun part—assembling the afghan.
-
Prepare the strip ends:
Along the short end of each strip, work 5 evenly spaced single crochets (sc). -
Create the first corner:
-
Take one strip from Color A and one from Color B.
-
Position them perpendicular to each other, crossing at the corner.
-
Single crochet through both layers at the corner.
-
-
Continue joining:
-
Working across the Color A strip, make 5 sc to attach the Color B strip, matching the stitches evenly.
-
Attach the next Color B strip from the back side of the Color A strip.
-
Alternate attaching strips from the front and back to create the woven effect.
-
At each corner, place 3 sc into the corner stitch.
-
-
Turn the corner:
-
Continue adding Color A strips perpendicular to the Color B row.
-
Again, alternate between front and back placement.
-
Focus on attaching the strips neatly; weaving comes later.
-
🧵 Step 3: Weave the Strips
Once all strips are attached and aligned, it’s time to weave.
-
Weave the long strips in an over-and-under pattern, alternating with each strip.
-
This step brings the basket-weave design to life and secures the structure.
🎀 Step 4: Add the Border
After weaving, finish your afghan with a border that complements the design.
Border ideas:
-
Simple: Hdc, ch 1, skip 1 for a structured, boxy edge.
-
Classic: A shell stitch border for a decorative, lacy look.
-
Clean: One or two rounds of single crochet for a minimalist finish.
At the final corner, add 2 extra sc into the same stitch where you started, then slip stitch to the first sc to join.
📏 Customizing the Size
To make a larger afghan, simply crochet and weave additional strips until the blanket reaches your preferred size. This modular construction makes resizing easy and flexible.
Tutorial Video Woven Afghan Here
The Woven Afghan is a creative and satisfying project suitable for all skill levels. With basic stitches and an engaging assembly process, it’s a fantastic way to explore color, texture, and design. Whether made for your home or as a thoughtful handmade gift, this afghan is sure to impress. 🧶✨